A Comprehensive Introduction to Command Line for R Users
bash
Getting Started with the Command Line
Author
Aravind Hebbali
Published
October 26, 2019
In this tutorial, you will be introduced to the command line. We have selected a set of commands we think will be useful in general to a wide range of audience. We have created a RStudio Cloud Project to ensure that all readers are using the same environment while going through the tutorial. Our goal was to ensure that after completing this tutorial, readers should be able to use the shell for version control, managing cloud services (like deploying your own shiny server etc.), execute commands in R & RMarkdown and execute R scripts in the shell. Apart from learning shell commands, the tutorial will also focus on
exploring R release names
mapping shell commands to R functions
RStudio Terminal
executing shell commands from R using system2() or processx::run()
execute shell commands in RMarkdown
execute R scripts in the shell
If you want a deeper understanding of using command line for data science, we suggest you read Data Science at the Command Line. Software Carpentry too has a lesson on shell. We have listed more references at the end of the tutorial for the benefit of the readers.
You can try our free online courseCommand Line Basics for R Users if you prefer to learn through self paced online courses or our ebook if you like to read the tutorial in a book format.
Introduction
{{% youtube “62hgg26RCC0” %}}
What is Shell/Terminal?
Shell is a text based application for viewing, handling & manipulating files. It takes in commands and passes them on to the operating system. It is also known as
CLI (Command Line Interface)
Bash (Bourne Again Shell)
Terminal
It is sufficient to know a handful of commands to get started with the shell.
Launch Terminal
Although we will use the terminal in RStudio on RStudio Cloud, we should still know how to launch the terminal in different operating systems.
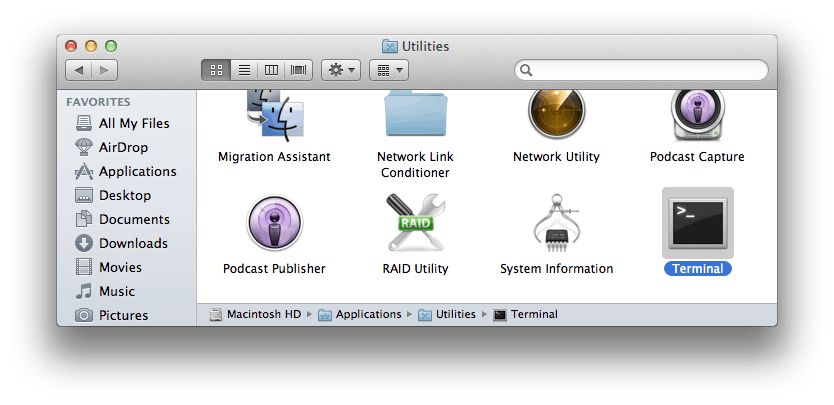
mac
Applications -> Utility -> Terminal
Windows
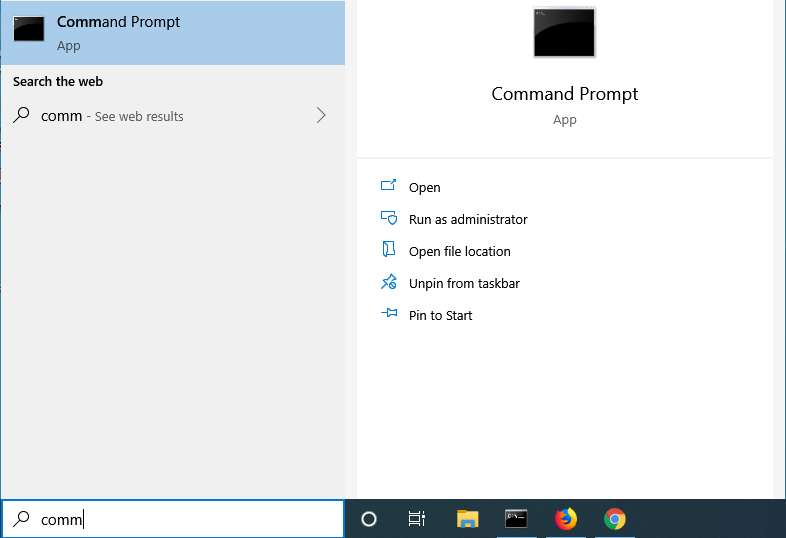
Option 1
Go to the Start Menu or screen and enter Command Prompt in the search field.
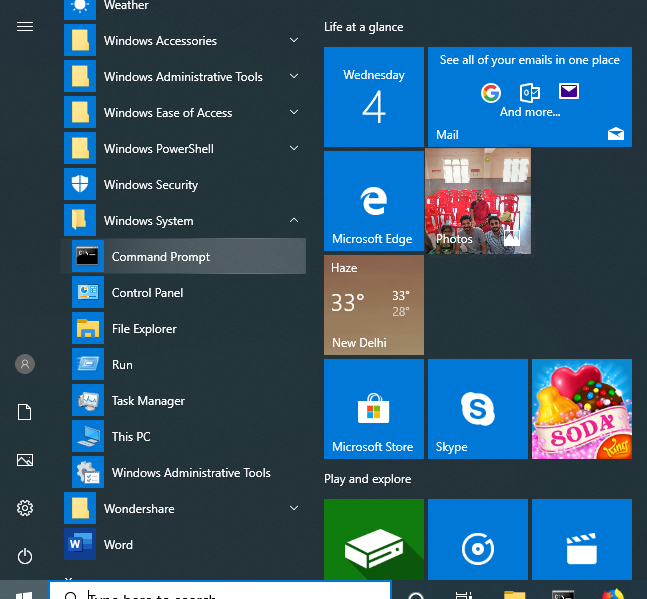
Option 2
Start Menu -> Windows System -> Command Prompt
Option 3
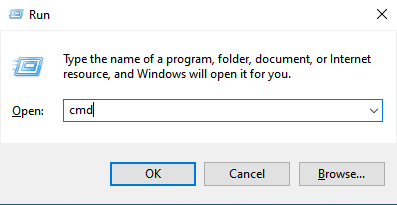
Hold the Windows key and press the R key to get a Run window. Type cmd in the box and click on the OK button.
Linux
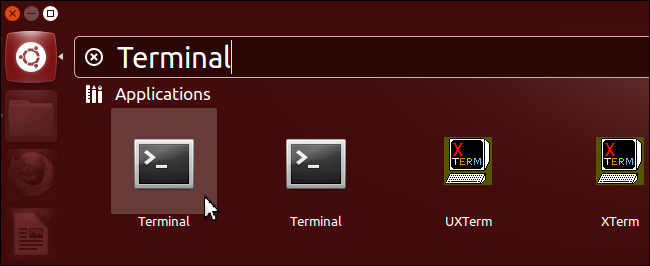
Applications -> Accessories -> Terminal
Applications -> System -> Terminal
Windows Subsystem for Linux
If you want to use bash on Windows, try the Windows subsystem for Linux. It only works on 64 bit Windows 10. Below are the steps to enable Windows subsystem fro Linux:
Step 1 - Enable Developer Mode
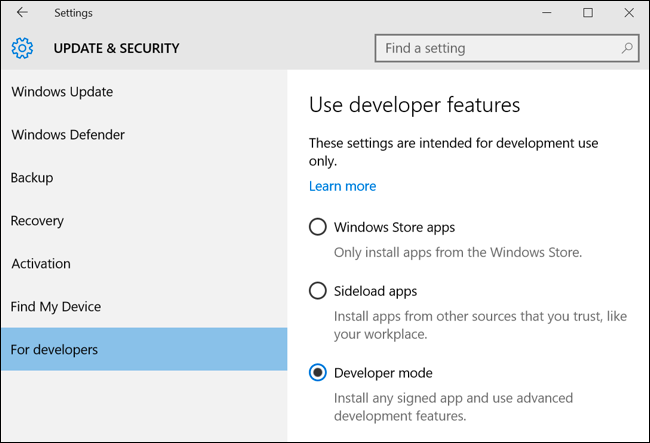
To enable Developer Mode open the Settings app and head to Update & Security > For Developers. Press the Developer Mode switch.
Step 2 - Enable Windows Subsystem for Linux
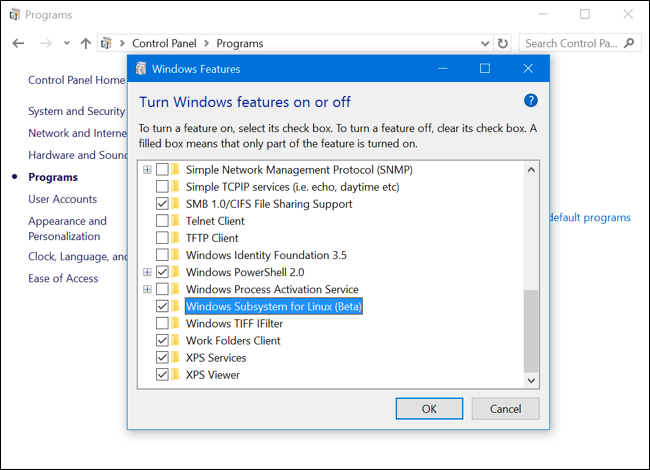
To enable the Windows Subsystem for Linux (Beta), open the Control Panel, click Programs and Features, and click Turn Windows Features On or Off in left side bar under Programs and Features. Enable the Windows Subsystem for Linux (Beta) option in the list here and click OK. After you do, you’ll be prompted to reboot your computer. Click Restart Now to reboot your computer and Windows 10 will install the new feature.
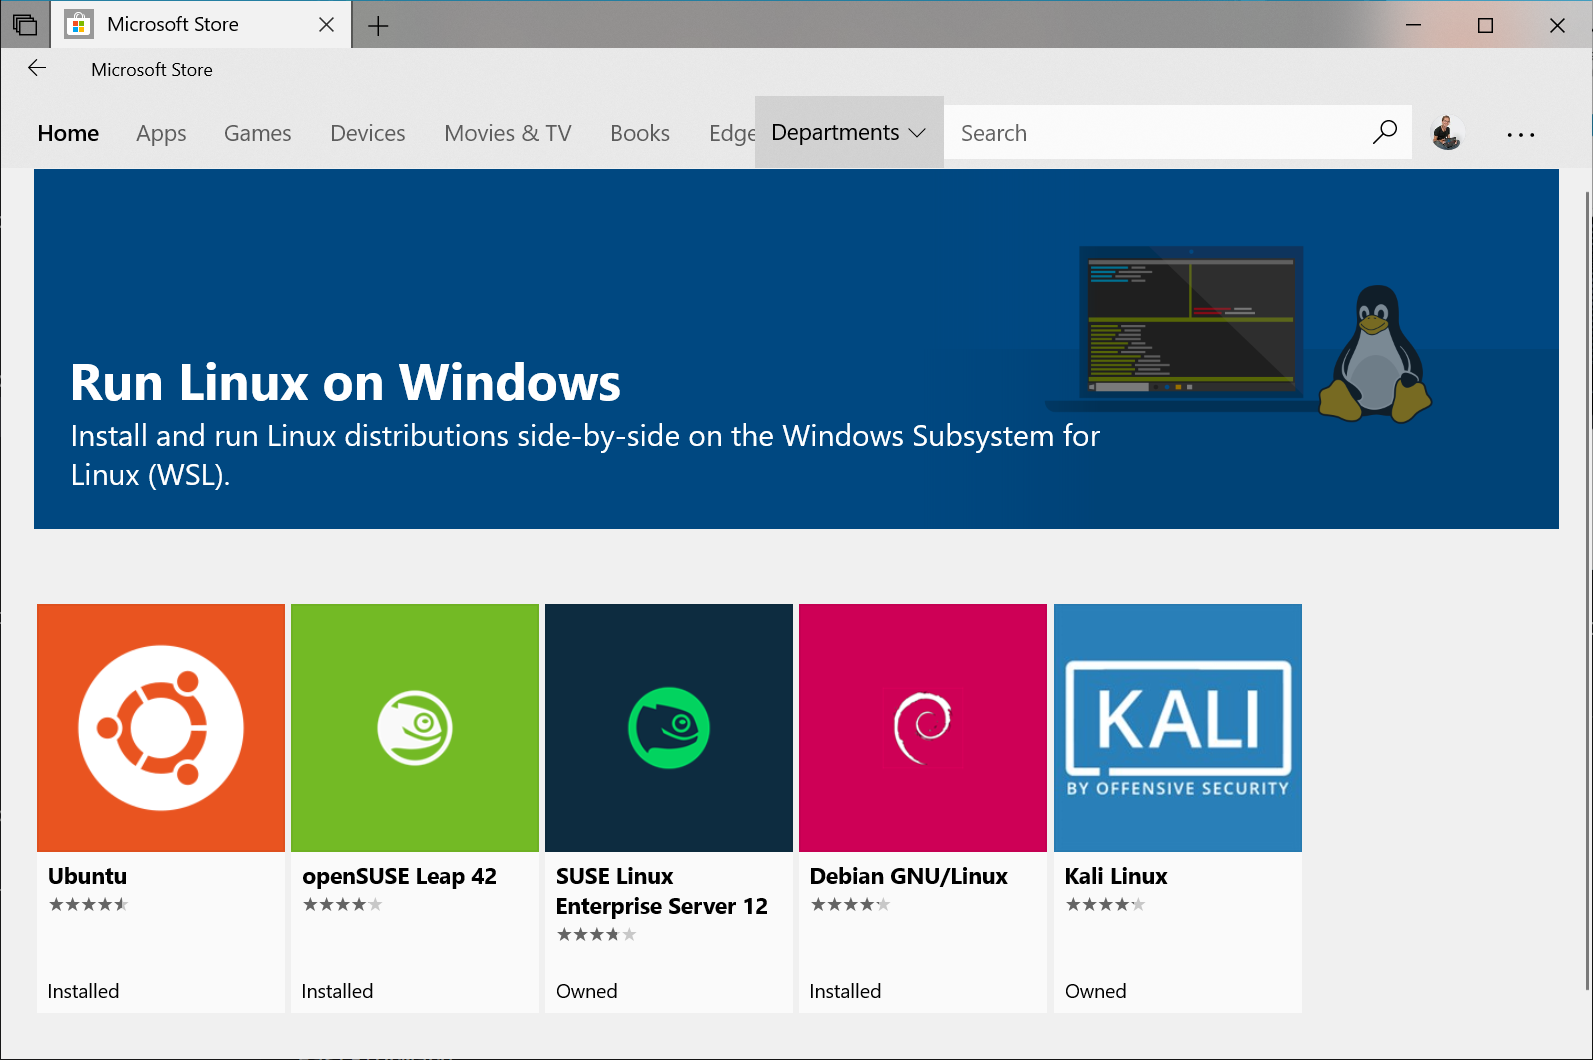
Step 3 - Install your Linux Distribution of Choice
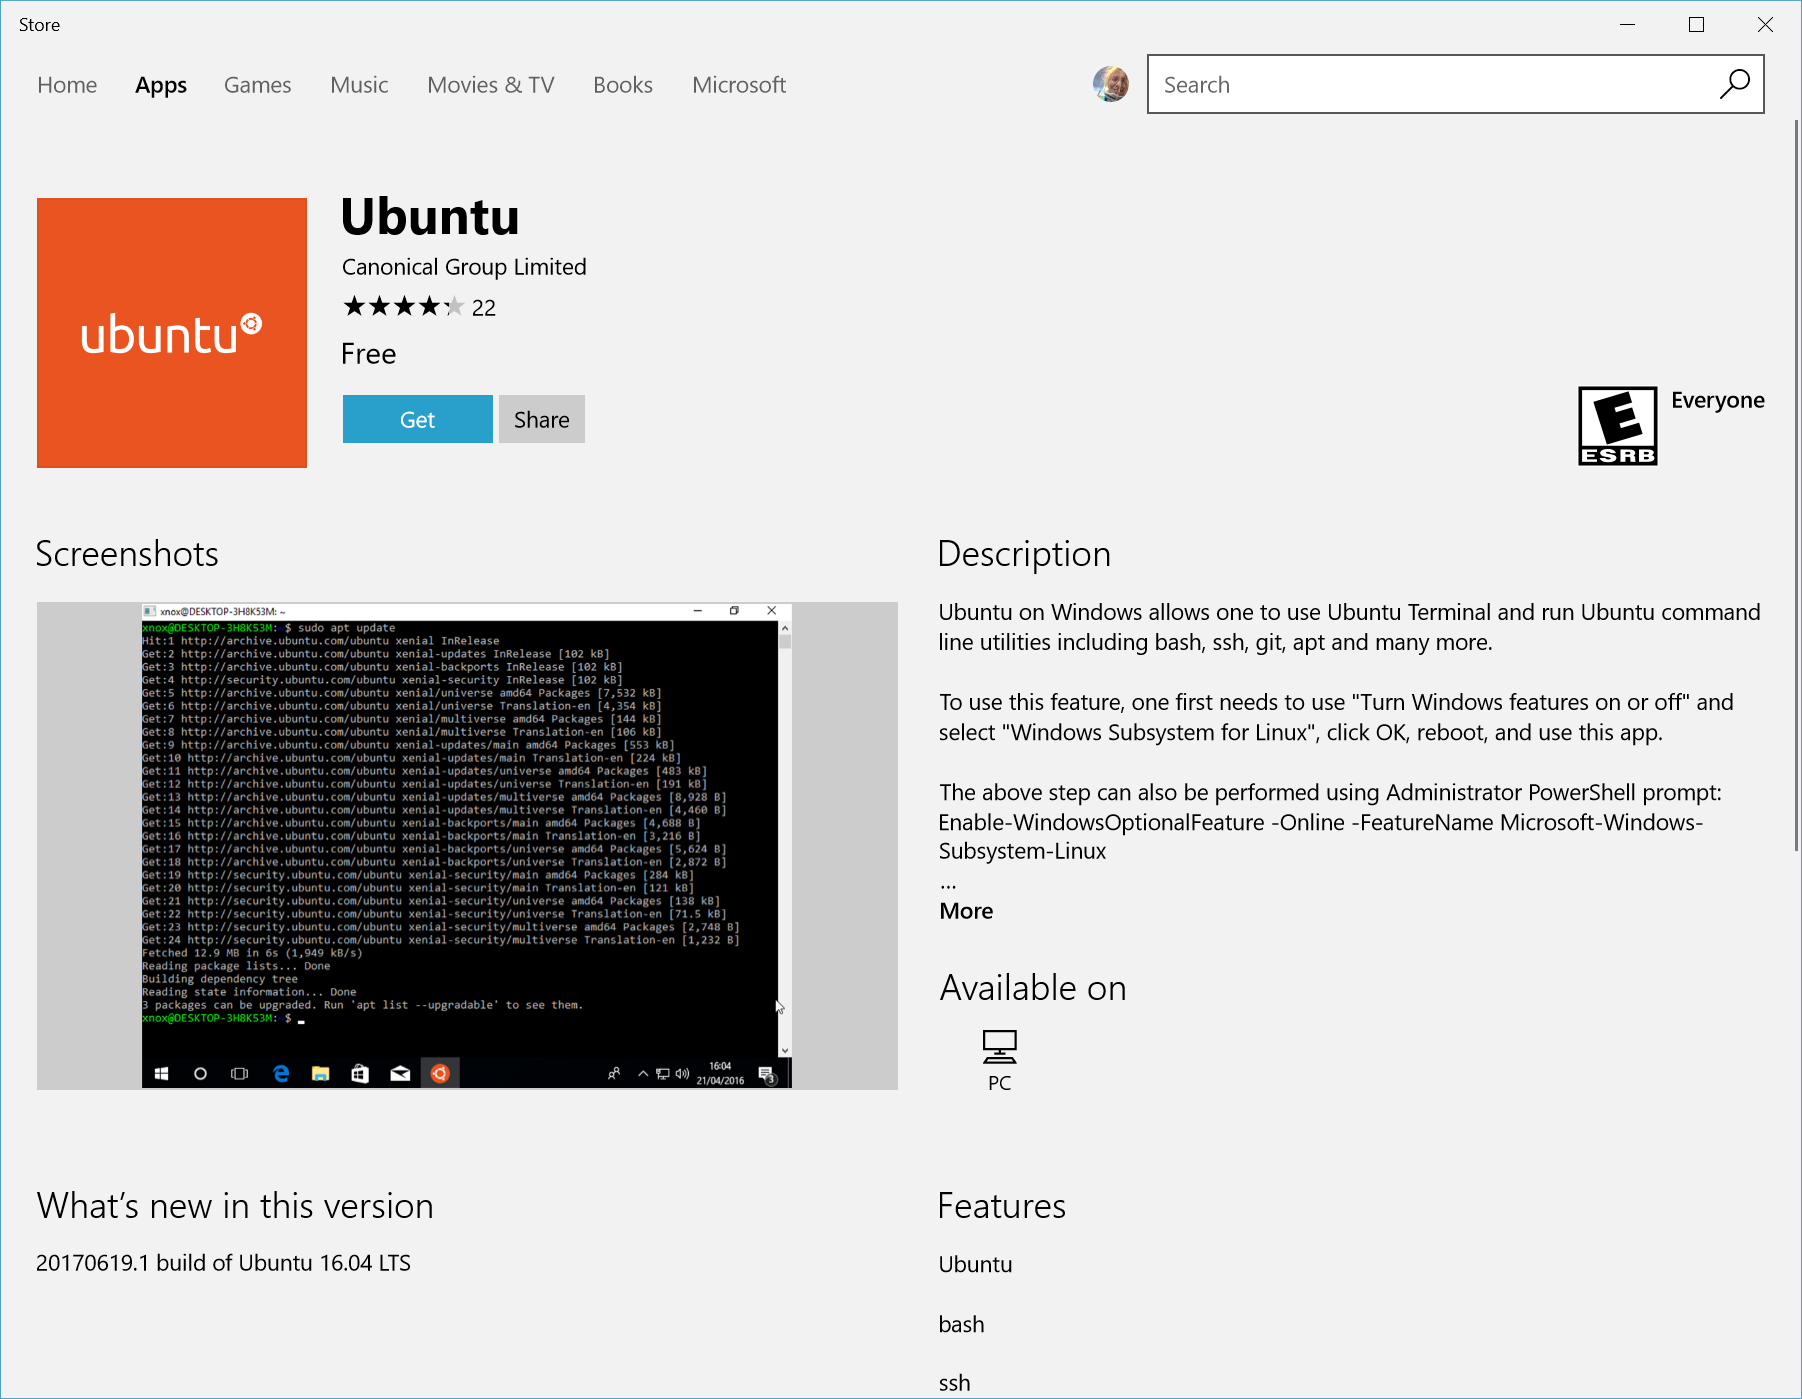
Open the Microsoft store and choose your favorite Linux distribution.
In the distro’s page, click on “Get”.
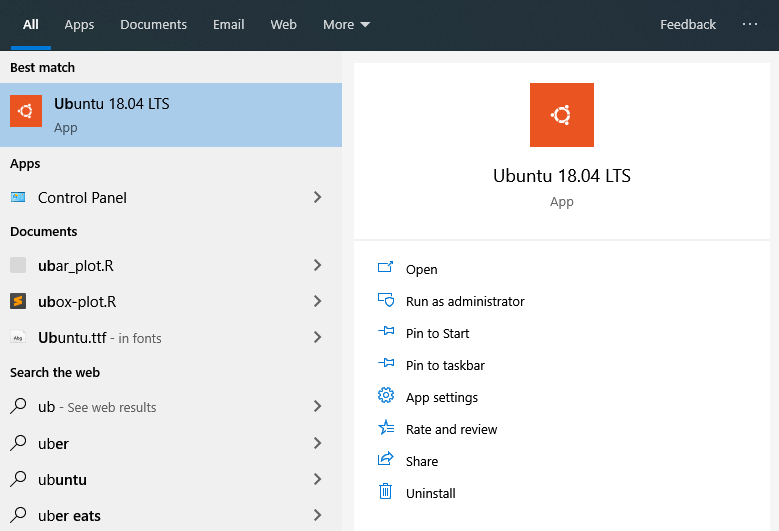
Launch the distro from the Start Menu.
You can learn more about the Windows Subsystem for Linux here.
RStudio Terminal
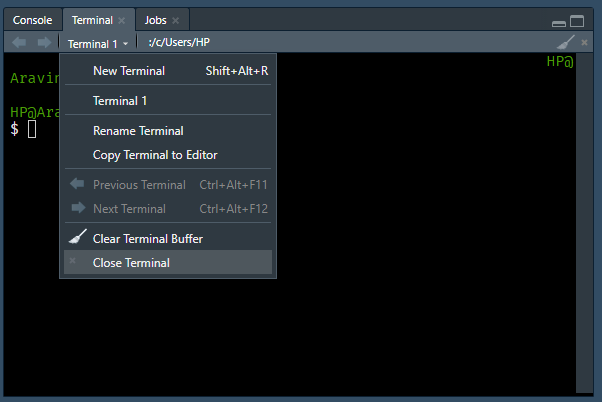
RStudio introduced the terminal with version 1.1.383. The terminal tab is next to the console tab. If it is not visible, use any of the below methods to launch it
Shift + Alt + T
Tools -> Terminal -> New Terminal
Note, the terminal depends on the underlying operating system. To learn more about the RStudio terminal, read this article or watch this webinar. In this book, we will use the RStudio terminal on RStudio Cloud to ensure that all users have access to Linux bash. You can try all the commands used in this book on your local system as well except in case of Windows users.
Prompt
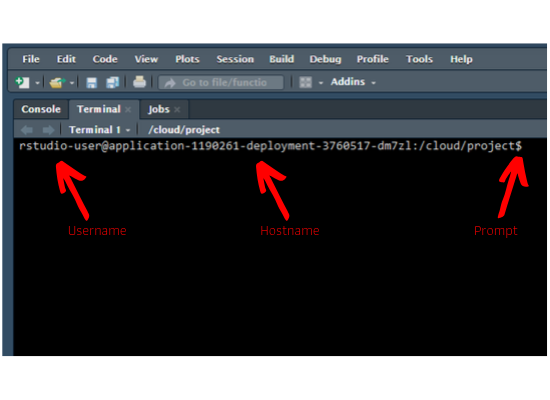
As soon as you launch the terminal, you will see the hostname, machine name and the prompt. In case of mac & Linux users, the prompt is $. For Windows users, it is >.
OS
Prompt
macOS
$
Linux
$
Windows
>
Get Started
To begin with, let us learn to display
basic information about the user
the current date & time
the calendar
and clear the screen.
Command
Description
whoami
Who is the user?
date
Get date, time and timezone
cal
Display calendar
clear
Clear the screen
whoami prints the effective user id i.e. the name of the user who runs the command. Use it to verify the user as which you are logged into the system.
whoami
## aravind
date will display or change the value of the system’s time and date information.
date
## Wed Jun 10 22:45:47 IST 2020
cal will display a formatted calendar and clear will clear all text on the screen and display a new prompt. You can clear the screen by pressing Ctrl + L as well.
cal
In R, we can get the user information from Sys.info() or whoami() from the whoami package. The current date & time are returned by Sys.date() & Sys.time(). To clear the R console, we use Ctrl + L.
Command
R
whoami
Sys.info() / whoami::whoami()
date
Sys.date() / Sys.time()
cal
clear
Ctrl + L
Help/Documentation
Before we proceed further, let us learn to view the documentation/manual pages of the commands.
Command
Description
man
Display manual pages for a command
whatis
Single line description of a command
man is used to view the system’s reference manual. Let us use it to view the documentation of the whatis command which we will use next.
man whatis
## WHATIS(1) Manual pager utils WHATIS(1)
##
## NAME
## whatis - display one-line manual page descriptions
##
## SYNOPSIS
## whatis [-dlv?V] [-r|-w] [-s list] [-m system[,...]] [-M path] [-L
## locale] [-C file] name ...
##
## DESCRIPTION
## Each manual page has a short description available within it. whatis
## searches the manual page names and displays the manual page descripâ€
## tions of any name matched.
##
## name may contain wildcards (-w) or be a regular expression (-r). Using
## these options, it may be necessary to quote the name or escape (\) the
## special characters to stop the shell from interpreting them.
##
## index databases are used during the search, and are updated by the
## mandb program. Depending on your installation, this may be run by a
## periodic cron job, or may need to be run manually after new manual
## pages have been installed. To produce an old style text whatis dataâ€
## base from the relative index database, issue the command:
##
## whatis -M manpath -w '*' | sort > manpath/whatis
##
## where manpath is a manual page hierarchy such as /usr/man.
##
## OPTIONS
## -d, --debug
## Print debugging information.
##
## -v, --verbose
## Print verbose warning messages.
##
## -r, --regex
## Interpret each name as a regular expression. If a name matches
## any part of a page name, a match will be made. This option
## causes whatis to be somewhat slower due to the nature of dataâ€
## base searches.
##
## -w, --wildcard
## Interpret each name as a pattern containing shell style wildâ€
## cards. For a match to be made, an expanded name must match the
## entire page name. This option causes whatis to be somewhat
## slower due to the nature of database searches.
##
## -l, --long
## Do not trim output to the terminal width. Normally, output will
## be truncated to the terminal width to avoid ugly results from
## poorly-written NAME sections.
##
## -s list, --sections list, --section list
## Search only the given manual sections. list is a colon- or
## comma-separated list of sections. If an entry in list is a simâ€
## ple section, for example "3", then the displayed list of
## descriptions will include pages in sections "3", "3perl", "3x",
## and so on; while if an entry in list has an extension, for examâ€
## ple "3perl", then the list will only include pages in that exact
## part of the manual section.
##
## -m system[,...], --systems=system[,...]
## If this system has access to other operating system's manual
## page names, they can be accessed using this option. To search
## NewOS's manual page names, use the option -m NewOS.
##
## The system specified can be a combination of comma delimited
## operating system names. To include a search of the native operâ€
## ating system's manual page names, include the system name man in
## the argument string. This option will override the $SYSTEM
## environment variable.
##
## -M path, --manpath=path
## Specify an alternate set of colon-delimited manual page hierarâ€
## chies to search. By default, whatis uses the $MANPATH environâ€
## ment variable, unless it is empty or unset, in which case it
## will determine an appropriate manpath based on your $PATH enviâ€
## ronment variable. This option overrides the contents of $MANâ€
## PATH.
##
## -L locale, --locale=locale
## whatis will normally determine your current locale by a call to
## the C function setlocale(3) which interrogates various environâ€
## ment variables, possibly including $LC_MESSAGES and $LA
whatis displays short manual page descriptions (each manual page has a short description available within it).
whatis ls
## ls (1) - list directory contents
You will find tldr.sh very useful while exploring new commands and there is a related R package, tldrrr as well.
## pwd
##
## Print name of current/working directory.
##
## • Print the current directory:
##
##   pwd
##
## • Print the current directory, and resolve all symlinks (i.e. show the "physical" path):
##
##   pwd -P
Navigating File System
{{% youtube “yn0sVrEM8AA” %}}
In this section, we will learn commands that will help us
navigate between different folders/directories
return current working directory
list all the files & folders in a directory
create and delete directories
Command
Description
pwd
Print working directory
ls
List directory contents
cd
Change current working directory
mkdir
Create directory
rmdir
Remove/delete directory
pwd displays the name of the present working directory.
pwd
## /mnt/j/R/Others/blogs/content/post/cline
ls displays information about files and directories in the current directory along with their associated metadata such as
size
ownership
modification date
With no options, it will list the files and directories in the current directory, sorted alphabetically.
cd (change directory) changes the current working directory. It is among the most used commands as it allows the user to move around the file system.
cd r
pwd
## /mnt/j/R/Others/blogs/content/post/cline/r
mkdir will create new directory. It will allow you to set file mode (permissions associated with the directory) i.e. who can open/modify/delete the directory.
rmdir will remove empty directories from the file system. It can be used to remove multiple empty directories as well. If the directory is not empty, rmdir will not remove it and instead display a warning that the directory is not empty.
Let us focus a bit more on changing working directory. The below table shows commands for changing working directory to
up one level
previous working directory
home directory
and root directory
Command
Description
cd .
Navigate into directory
cd ..
Go up one level
cd -
Go to previous working directory
cd ~
Change directory to home directory
cd /
Change directory to root directory
All files and directories stem from one main directory, the root directory. All the other directories in the system are sub-directories of the root directory and the root directory has no parent directory. It is represented by a single slash (/). cd / will change the current working directory to the root directory. In RStudio Cloud, use cd and cd .. to navigate back to the current working directory. If you get confused, close the terminal and relaunch it.
cd /
pwd
## /
The parent directory i.e. the directory one level up from the current directory which contains the directory we are in now is represented by two dots (..). cd .. will change us into the parent directory of the current directory.
cd ..
pwd
## /mnt/j/R/Others/blogs/content/post
The home directory is the directory we are placed in, by default, when we launch a new terminal session. It is represented by the tilde (~). In RStudio Cloud, use cd and cd .. to navigate back to the current working directory. If you get confused, close the terminal and relaunch it.
cd ~
pwd
## /home/aravind
To change into the previous working directory, use cd -.
Display file permissions, ownership, size & modification date
ls -la
## total 31108
## drwxrwxrwx 1 aravind aravind     4096 Jun 10 22:46 .
## drwxrwxrwx 1 aravind aravind     4096 Jun 10 22:45 ..
## -rwxrwxrwx 1 aravind aravind       12 Jun  3 13:51 analysis.R
## -rwxrwxrwx 1 aravind aravind      430 Jun  3 13:51 bash.R
## -rwxrwxrwx 1 aravind aravind    16242 Jun  3 13:51 bash.sh
## -rwxrwxrwx 1 aravind aravind       35 Jun  3 13:51 imports_blorr.txt
## -rwxrwxrwx 1 aravind aravind       34 Jun  3 13:51 imports_olsrr.txt
## -rwxrwxrwx 1 aravind aravind    39501 Jun  3 13:51 lorem-ipsum.txt
## -rwxrwxrwx 1 aravind aravind     9291 Jun  3 13:51 main_project.zip
## drwxrwxrwx 1 aravind aravind     4096 Jun  3 13:51 myfiles
## drwxrwxrwx 1 aravind aravind     4096 Jun  3 13:51 mypackage
## drwxrwxrwx 1 aravind aravind     4096 Jun  3 13:51 myproject
## drwxrwxrwx 1 aravind aravind     4096 Jun  3 13:51 myproject1
## drwxrwxrwx 1 aravind aravind     4096 Jun  3 13:51 myproject2
## drwxrwxrwx 1 aravind aravind     4096 Jun  3 13:51 myproject3
## drwxrwxrwx 1 aravind aravind     4096 Jun  3 13:51 myproject4
## -rwxrwxrwx 1 aravind aravind     1498 Jun  3 13:51 package_names.txt
## -rwxrwxrwx 1 aravind aravind     1082 Jun  3 13:51 pkg_names.txt
## drwxrwxrwx 1 aravind aravind     4096 Jun  3 13:51 r
## -rwxrwxrwx 1 aravind aravind    10240 Jun  3 13:51 release_names.tar
## -rwxrwxrwx 1 aravind aravind      632 Jun  3 13:51 release_names.tar.gz
## -rwxrwxrwx 1 aravind aravind      546 Jun  3 13:51 release_names.txt
## -rwxrwxrwx 1 aravind aravind       65 Jun  3 13:51 release_names_18.txt
## -rwxrwxrwx 1 aravind aravind       53 Jun  3 13:51 release_names_19.txt
## -rwxrwxrwx 1 aravind aravind 31754998 Jun  3 13:51 sept_15.csv.gz
## -rwxrwxrwx 1 aravind aravind      157 Jun  3 13:51 urls.txt
## -rwxrwxrwx 1 aravind aravind     4398 Jun  3 13:51 zip_example.zip
Display size in human readable format
ls -lh
## total 31M
## -rwxrwxrwx 1 aravind aravind   12 Jun  3 13:51 analysis.R
## -rwxrwxrwx 1 aravind aravind  430 Jun  3 13:51 bash.R
## -rwxrwxrwx 1 aravind aravind  16K Jun  3 13:51 bash.sh
## -rwxrwxrwx 1 aravind aravind   35 Jun  3 13:51 imports_blorr.txt
## -rwxrwxrwx 1 aravind aravind   34 Jun  3 13:51 imports_olsrr.txt
## -rwxrwxrwx 1 aravind aravind  39K Jun  3 13:51 lorem-ipsum.txt
## -rwxrwxrwx 1 aravind aravind 9.1K Jun  3 13:51 main_project.zip
## drwxrwxrwx 1 aravind aravind 4.0K Jun  3 13:51 myfiles
## drwxrwxrwx 1 aravind aravind 4.0K Jun  3 13:51 mypackage
## drwxrwxrwx 1 aravind aravind 4.0K Jun  3 13:51 myproject
## drwxrwxrwx 1 aravind aravind 4.0K Jun  3 13:51 myproject1
## drwxrwxrwx 1 aravind aravind 4.0K Jun  3 13:51 myproject2
## drwxrwxrwx 1 aravind aravind 4.0K Jun  3 13:51 myproject3
## drwxrwxrwx 1 aravind aravind 4.0K Jun  3 13:51 myproject4
## -rwxrwxrwx 1 aravind aravind 1.5K Jun  3 13:51 package_names.txt
## -rwxrwxrwx 1 aravind aravind 1.1K Jun  3 13:51 pkg_names.txt
## drwxrwxrwx 1 aravind aravind 4.0K Jun  3 13:51 r
## -rwxrwxrwx 1 aravind aravind  10K Jun  3 13:51 release_names.tar
## -rwxrwxrwx 1 aravind aravind  632 Jun  3 13:51 release_names.tar.gz
## -rwxrwxrwx 1 aravind aravind  546 Jun  3 13:51 release_names.txt
## -rwxrwxrwx 1 aravind aravind   65 Jun  3 13:51 release_names_18.txt
## -rwxrwxrwx 1 aravind aravind   53 Jun  3 13:51 release_names_19.txt
## -rwxrwxrwx 1 aravind aravind  31M Jun  3 13:51 sept_15.csv.gz
## -rwxrwxrwx 1 aravind aravind  157 Jun  3 13:51 urls.txt
## -rwxrwxrwx 1 aravind aravind 4.3K Jun  3 13:51 zip_example.zip
Sort list by size
ls -lS
## total 31108
## -rwxrwxrwx 1 aravind aravind 31754998 Jun  3 13:51 sept_15.csv.gz
## -rwxrwxrwx 1 aravind aravind    39501 Jun  3 13:51 lorem-ipsum.txt
## -rwxrwxrwx 1 aravind aravind    16242 Jun  3 13:51 bash.sh
## -rwxrwxrwx 1 aravind aravind    10240 Jun  3 13:51 release_names.tar
## -rwxrwxrwx 1 aravind aravind     9291 Jun  3 13:51 main_project.zip
## -rwxrwxrwx 1 aravind aravind     4398 Jun  3 13:51 zip_example.zip
## drwxrwxrwx 1 aravind aravind     4096 Jun  3 13:51 myfiles
## drwxrwxrwx 1 aravind aravind     4096 Jun  3 13:51 mypackage
## drwxrwxrwx 1 aravind aravind     4096 Jun  3 13:51 myproject
## drwxrwxrwx 1 aravind aravind     4096 Jun  3 13:51 myproject1
## drwxrwxrwx 1 aravind aravind     4096 Jun  3 13:51 myproject2
## drwxrwxrwx 1 aravind aravind     4096 Jun  3 13:51 myproject3
## drwxrwxrwx 1 aravind aravind     4096 Jun  3 13:51 myproject4
## drwxrwxrwx 1 aravind aravind     4096 Jun  3 13:51 r
## -rwxrwxrwx 1 aravind aravind     1498 Jun  3 13:51 package_names.txt
## -rwxrwxrwx 1 aravind aravind     1082 Jun  3 13:51 pkg_names.txt
## -rwxrwxrwx 1 aravind aravind      632 Jun  3 13:51 release_names.tar.gz
## -rwxrwxrwx 1 aravind aravind      546 Jun  3 13:51 release_names.txt
## -rwxrwxrwx 1 aravind aravind      430 Jun  3 13:51 bash.R
## -rwxrwxrwx 1 aravind aravind      157 Jun  3 13:51 urls.txt
## -rwxrwxrwx 1 aravind aravind       65 Jun  3 13:51 release_names_18.txt
## -rwxrwxrwx 1 aravind aravind       53 Jun  3 13:51 release_names_19.txt
## -rwxrwxrwx 1 aravind aravind       35 Jun  3 13:51 imports_blorr.txt
## -rwxrwxrwx 1 aravind aravind       34 Jun  3 13:51 imports_olsrr.txt
## -rwxrwxrwx 1 aravind aravind       12 Jun  3 13:51 analysis.R
Sort list by modification date
ls -ltr
## total 31108
## -rwxrwxrwx 1 aravind aravind      546 Jun  3 13:51 release_names.txt
## -rwxrwxrwx 1 aravind aravind    10240 Jun  3 13:51 release_names.tar
## -rwxrwxrwx 1 aravind aravind     4398 Jun  3 13:51 zip_example.zip
## -rwxrwxrwx 1 aravind aravind     9291 Jun  3 13:51 main_project.zip
## drwxrwxrwx 1 aravind aravind     4096 Jun  3 13:51 r
## drwxrwxrwx 1 aravind aravind     4096 Jun  3 13:51 myfiles
## -rwxrwxrwx 1 aravind aravind      632 Jun  3 13:51 release_names.tar.gz
## drwxrwxrwx 1 aravind aravind     4096 Jun  3 13:51 myproject3
## -rwxrwxrwx 1 aravind aravind       35 Jun  3 13:51 imports_blorr.txt
## -rwxrwxrwx 1 aravind aravind       65 Jun  3 13:51 release_names_18.txt
## -rwxrwxrwx 1 aravind aravind       53 Jun  3 13:51 release_names_19.txt
## -rwxrwxrwx 1 aravind aravind       34 Jun  3 13:51 imports_olsrr.txt
## -rwxrwxrwx 1 aravind aravind     1498 Jun  3 13:51 package_names.txt
## -rwxrwxrwx 1 aravind aravind      157 Jun  3 13:51 urls.txt
## drwxrwxrwx 1 aravind aravind     4096 Jun  3 13:51 myproject1
## -rwxrwxrwx 1 aravind aravind     1082 Jun  3 13:51 pkg_names.txt
## -rwxrwxrwx 1 aravind aravind 31754998 Jun  3 13:51 sept_15.csv.gz
## drwxrwxrwx 1 aravind aravind     4096 Jun  3 13:51 mypackage
## -rwxrwxrwx 1 aravind aravind    16242 Jun  3 13:51 bash.sh
## drwxrwxrwx 1 aravind aravind     4096 Jun  3 13:51 myproject2
## -rwxrwxrwx 1 aravind aravind       12 Jun  3 13:51 analysis.R
## drwxrwxrwx 1 aravind aravind     4096 Jun  3 13:51 myproject
## -rwxrwxrwx 1 aravind aravind      430 Jun  3 13:51 bash.R
## -rwxrwxrwx 1 aravind aravind    39501 Jun  3 13:51 lorem-ipsum.txt
## drwxrwxrwx 1 aravind aravind     4096 Jun  3 13:51 myproject4
R Functions
In R, getwd() will return the current working directory. You can use here() from the here package as well. To change the current working directory, use setwd(). The fs package provides useful functions for file operations.
cp makes copies of files and directories. The general form of the command is cp source destination. By default, it will overwrite files without prompting for confirmation so be cautious while copying files or folders.
Copy files in same folder
Let us create a copy of release_names.txt file and name it as release_names_2.txt.
To copy a file into a different directory/folder, we need to specify the name of the destination folder. If the copied file should have a different name, then we need to specify the new name of the file as well. Let us copy the release_names.txt file into the r_releases folder (we will retain the same name for the file as we are copying it into a different folder).
cp release_names.txt r_releases/release_names.txt
Let us check if the file has been copied by listing the files in the r_releases folder using ls.
ls r_releases
## release_names.txt
Copy folders
How about making copies of folders? Use the -r option to copy entire folders. Let us create a copy of the r folder and name it as r2. The -r option stands for –recursive i.e. copy directories recursively.
Let us check if release_names_2.txt is present in the r_releases folder. Great! We have successfully moved the file into a different folder.
ls r_releases
## release_names.txt
## release_names_2.txt
Move files in verbose mode
To view the details of the files being moved/renamed, use the -v option. In the below example, we move the release_names_3.txt file into the r_releases folder using mv.
How do we ensure that files are not overwritten without prompting the user first? In the below example, we will try to overwrite the release_names_2.txt in the r_releases folder using mv and see what happens. But first, let us look at the contents of the release_names_2.txt file using the cat command.
We will look into the cat command in more detail in the next chapter but for the time being it is sufficient to know that it prints contents of a file. The file contains release names of different R versions.
cat r_releases/release_names_2.txt
## Unsuffered Consequences
## Great Pumpkin
## December Snowflakes
## Gift-Getting Season
## Easter Beagle
## Roasted Marshmallows
## Trick or Treat
## Security Blanket
## Masked Marvel
## Good Sport
## Frisbee Sailing
## Warm Puppy
## Spring Dance
## Sock it to Me
## Pumpkin Helmet
## Smooth Sidewalk
## Full of Ingredients
## World-Famous Astronaut
## Fire Safety
## Wooden Christmas Tree
## Very Secure Dishes
## Very, Very Secure Dishes
## Supposedly Educational
## Bug in Your Hair
## Sincere Pumpkin Patch
## Another Canoe
## You Stupid Darkness
## Single Candle
## Short Summer
## Kite Eating Tree
In our current working directory, we will create another file of the same name i.e. release_names_2.txt but its contents are different from the file in the r_releases folder. It contains the string release_names and nothing else. We will now move this file into the r_releases folder but use the option -n to ensure that the file in the r_releases folder is not overwritten. We can confirm this by printing the contents of the file in the r_releases folder.
The echo command is used to print text to the terminal or to write to a file. We will explore it in more detail in the next chapter.
## Unsuffered Consequences
## Great Pumpkin
## December Snowflakes
## Gift-Getting Season
## Easter Beagle
## Roasted Marshmallows
## Trick or Treat
## Security Blanket
## Masked Marvel
## Good Sport
## Frisbee Sailing
## Warm Puppy
## Spring Dance
## Sock it to Me
## Pumpkin Helmet
## Smooth Sidewalk
## Full of Ingredients
## World-Famous Astronaut
## Fire Safety
## Wooden Christmas Tree
## Very Secure Dishes
## Very, Very Secure Dishes
## Supposedly Educational
## Bug in Your Hair
## Sincere Pumpkin Patch
## Another Canoe
## You Stupid Darkness
## Single Candle
## Short Summer
## Kite Eating Tree
As you can observe, the contents of the file in the r_releases folder has not changed. In the next section, we will learn to overwrite the contents using the -f option.
Do not prompt for confirmation before overwriting files
What if we actually intend to overwrite a file and do not want to be prompted for confirming the same. In this case, we can use the -f option which stands for –force i.e. do not prompt before overwriting. Let us first print the contents of the release_names_2.txt file in the r_releases folder.
cat r_releases/release_names_2.txt
## Unsuffered Consequences
## Great Pumpkin
## December Snowflakes
## Gift-Getting Season
## Easter Beagle
## Roasted Marshmallows
## Trick or Treat
## Security Blanket
## Masked Marvel
## Good Sport
## Frisbee Sailing
## Warm Puppy
## Spring Dance
## Sock it to Me
## Pumpkin Helmet
## Smooth Sidewalk
## Full of Ingredients
## World-Famous Astronaut
## Fire Safety
## Wooden Christmas Tree
## Very Secure Dishes
## Very, Very Secure Dishes
## Supposedly Educational
## Bug in Your Hair
## Sincere Pumpkin Patch
## Another Canoe
## You Stupid Darkness
## Single Candle
## Short Summer
## Kite Eating Tree
Now we will create another file of the same name in the current working directory but with different content and use the -f option to overwrite the file in the r_releases folder. You can see that the contents of the file in the r_releases folder has changed.
How about folders or directories? We can remove a directory and all its contents including sub-directories using the option -r which stands for –recursive and removes directories and their contents recursively. Let us remove the myproject1 folder and all its contents.
Use the -f option which stands for –force to forciby remove directory and all its contents without prompting for confirmation or showing error messages. Let us remove the myproject2 folder and all its contents.
Remove files in verbose mode, printing a message for each removed file. This is useful when you want to see the details of the files being removed. In the below example, we will remove all files with .txt extension from the myfiles folder. Instead of specifying the name of each text file, we use the wildcard * along with .txt i.e. any file with the extension .txt will be removed.
diff stands for difference. It is used to compare files line by line and display differences. It also indicates which lines in one file must be changed to make the files identical. Using additional options, we can
ignore white spaces while comparing files
show differences sidy by side
show differences in unified format
compare directories recursively
display names of files that differ
Command
Description
diff
Compare files & directories
diff -w
Compare files; ignoring white spaces
diff -y
Compare files; showing differences side by side
diff -u
Compare files; show differences in unified format
diff -r
Compare directories recursively
diff -rq
Compare directories; show the names of files that differ
Compare Files
Let us compare the contents of the following files
imports_olsrr.txt
imports_blorr.txt
The files contain the names of R packages imported by the olsrr and blorr packages respectively (Full disclosure: both the above R pakages are developed by Rsquared Academy.).
diff uses certain special symbols and gives instructions to make the files identical. The instructions are on how to change the first file to make it identical to the second file. We list the symbols below
a for add
c for change
d for delete
We will use the -w option to ignore white spaces while comparing the files.
diff -w imports_olsrr.txt imports_blorr.txt
## 1a2
## > caret
## 3d3
## < cli
## 4a5
## > cli
Let us interpret the results. 4a5 indicates after line 4 in file 1, add line 5 from file 2 to make both the files identical i.e. add caret which is line 5 in imports_blorr.txt after line 4 in imports_olsrr.txt which will make both the files identical.
Let us change the file order and see the instructions from diff.
5d4 indicates delete line 5 from file 1 to match both the files at line4 i.e. delete caret which is line 5 in imports_blorr.txt to make both the files identical.
Side By Side
To view the differences between the files side by side, use the -y option.
diff -y imports_olsrr.txt imports_blorr.txt
## car
                                  | car
## checkmate
                                  | caret
## cli
                                  | checkmate
## clisymbols
                                  | clisymbols
##                                > cli
Unified Format
To view the differences between the files in a unified format, use the -u option.
To compare recursively, use the -r option. Let us compare the mypackage and myproject folders.
diff -r mypackage myproject
## Only in mypackage: .Rbuildignore
## Only in mypackage: DESCRIPTION
## Only in mypackage: LICENSE
## Only in mypackage: NAMESPACE
## Only in mypackage: NEWS.md
## Only in mypackage: R
## Only in myproject/data: processed
## Only in myproject/data: raw
## Only in mypackage: docs
## Only in mypackage: man
## Only in myproject: output
## Only in myproject: run_analysis.R
## Only in mypackage: tests
## Only in mypackage: vignettes
File Details
To compare directories and view the names of files that differ, use the -rq option. In the below example, we look at the names of files that differ in mypackage and myproject folders.
diff -rq mypackage myproject
## Only in mypackage: .Rbuildignore
## Only in mypackage: DESCRIPTION
## Only in mypackage: LICENSE
## Only in mypackage: NAMESPACE
## Only in mypackage: NEWS.md
## Only in mypackage: R
## Only in myproject/data: processed
## Only in myproject/data: raw
## Only in mypackage: docs
## Only in mypackage: man
## Only in myproject: output
## Only in myproject: run_analysis.R
## Only in mypackage: tests
## Only in mypackage: vignettes
R Functions
In R, file operations can be performed using functions from both base R and the fs package.
In this section, we will explore commands that will
display messages
print file contents
sort file contents
Command
Description
echo
Display messages
cat
Print contents of a file
head
Prints first ten lines of a file by default
tail
Prints last ten lines of a file by default
more
Open a file for interactive reading, scrolling & searching
less
Open a file for interactive reading, scrolling & searching
sort
Sort a file in ascending order
Display Messages
The echo command prints text to the terminal. It can be used for writing or appending messages to a file as well.
Command
Description
echo
Display messages
echo -n
Print message without trailing new line
echo > file
Write message to a file
echo >> file
Append message to a file
echo -e
Enable interpretation of special characters
Print Message
Let us start with a simple example. We will print the text Action of the Toes to the terminal. It is the release name for R version 3.6.1.
echo Action of the Toes
Redirect Output
What if we want to redirect the output? Instead of printing the text to the terminal, we want to write it to a file. In such cases, use > along with the file name to redirect the output to the file. Keep in mind that > will overwrite files. If you want to append to files instead of overwriting, use >>.
echo Great Truth > release.txt
Print & Concatenate Files
The cat command reads data from files, and outputs their contents. It is the simplest way to display the contents of a file at the command line. It can be used to overwrite or append new content to files as well. cat stands for catenate and can be used to
display text files
copy text files into a new document
append the contents of a text file to the end of another text file, combining them
Command
Description
cat
Print & concatenate files
cat >
Concatenate several files into the target file
cat >>
Append several files into the target file
cat -n
Number all output lines
Print Content
Let us print the content of the release_names.txt file (it contains R release names).
cat release_names.txt
## Unsuffered Consequences
## Great Pumpkin
## December Snowflakes
## Gift-Getting Season
## Easter Beagle
## Roasted Marshmallows
## Trick or Treat
## Security Blanket
## Masked Marvel
## Good Sport
## Frisbee Sailing
## Warm Puppy
## Spring Dance
## Sock it to Me
## Pumpkin Helmet
## Smooth Sidewalk
## Full of Ingredients
## World-Famous Astronaut
## Fire Safety
## Wooden Christmas Tree
## Very Secure Dishes
## Very, Very Secure Dishes
## Supposedly Educational
## Bug in Your Hair
## Sincere Pumpkin Patch
## Another Canoe
## You Stupid Darkness
## Single Candle
## Short Summer
## Kite Eating Tree
Number All Output Lines
If you want to number the output line, use the -n option.
cat -n release_names.txt
##      1   Unsuffered Consequences
##      2   Great Pumpkin
##      3   December Snowflakes
##      4   Gift-Getting Season
##      5   Easter Beagle
##      6   Roasted Marshmallows
##      7   Trick or Treat
##      8   Security Blanket
##      9   Masked Marvel
##     10   Good Sport
##     11   Frisbee Sailing
##     12   Warm Puppy
##     13   Spring Dance
##     14   Sock it to Me
##     15   Pumpkin Helmet
##     16   Smooth Sidewalk
##     17   Full of Ingredients
##     18   World-Famous Astronaut
##     19   Fire Safety
##     20   Wooden Christmas Tree
##     21   Very Secure Dishes
##     22   Very, Very Secure Dishes
##     23   Supposedly Educational
##     24   Bug in Your Hair
##     25   Sincere Pumpkin Patch
##     26   Another Canoe
##     27   You Stupid Darkness
##     28   Single Candle
##     29   Short Summer
##     30   Kite Eating Tree
Concatenate Several Files
To concatenate the contents of several files into a target file, use >. In the below example, we concatenate the contents of the files release_names_18.txt and release_names_19.txt into a single file release_names_18_19.txt. In this case we are not printing the contents of the file to the terminal and instead we concatenate the contents from both the files and redirect the output to the target file.
## Someone to Lean On
## Joy in Playing
## Feather Spray
## Eggshell IglooGreat Truth
## Planting of a Tree
## Action of the Toes
Head
The head command will display the firt 10 lines of a file(s) by default. It can be used to display the first few lines or bytes of a file as well.
Command
Description
head
Output the first parts of a file
head -n
Output the first n lines of a file
head -c
Output the first c bytes of a file
head -n -x
Output everything but the last x lines of a file
head -c -x
Output everything but the last x bytes of a file
Output the first parts of a file
Let us use head to display the first 10 lines of the release_names.txt file.
head release_names.txt
## Unsuffered Consequences
## Great Pumpkin
## December Snowflakes
## Gift-Getting Season
## Easter Beagle
## Roasted Marshmallows
## Trick or Treat
## Security Blanket
## Masked Marvel
## Good Sport
Output the first n lines of a file
Using the n option, we can specify the number of lines to be displayed. In the below example, we display the first 5 lines.
head -n 5 release_names.txt
## Unsuffered Consequences
## Great Pumpkin
## December Snowflakes
## Gift-Getting Season
## Easter Beagle
Output the first c bytes of a file
The c option can be used to display characters or bytes instead of lines. Let us display the first 5 bytes of the release_names.txt file.
head -c 5 release_names.txt
## Unsuf
Output everything but the last 5 lines of a file
To display the last parts of a file, use - while specifying the number of lines. In the below example, we display the last 5 lines of the file.
head -n -5 release_names.txt
## Unsuffered Consequences
## Great Pumpkin
## December Snowflakes
## Gift-Getting Season
## Easter Beagle
## Roasted Marshmallows
## Trick or Treat
## Security Blanket
## Masked Marvel
## Good Sport
## Frisbee Sailing
## Warm Puppy
## Spring Dance
## Sock it to Me
## Pumpkin Helmet
## Smooth Sidewalk
## Full of Ingredients
## World-Famous Astronaut
## Fire Safety
## Wooden Christmas Tree
## Very Secure Dishes
## Very, Very Secure Dishes
## Supposedly Educational
## Bug in Your Hair
## Sincere Pumpkin Patch
Output everything but the last 3 bytes of a file
In this example, we display the last 3 bytes of the file using the c option and - while specifying the number of bytes.
head -c -3 release_names.txt
## Unsuffered Consequences
## Great Pumpkin
## December Snowflakes
## Gift-Getting Season
## Easter Beagle
## Roasted Marshmallows
## Trick or Treat
## Security Blanket
## Masked Marvel
## Good Sport
## Frisbee Sailing
## Warm Puppy
## Spring Dance
## Sock it to Me
## Pumpkin Helmet
## Smooth Sidewalk
## Full of Ingredients
## World-Famous Astronaut
## Fire Safety
## Wooden Christmas Tree
## Very Secure Dishes
## Very, Very Secure Dishes
## Supposedly Educational
## Bug in Your Hair
## Sincere Pumpkin Patch
## Another Canoe
## You Stupid Darkness
## Single Candle
## Short Summer
## Kite Eating Tre
Tail
The tail command displays the last 10 lines of a file(s) by default. It can be used to display the last few lines or bytes of a file as well.
Command
Description
tail
Display the last part of a file
tail -n num
Show the last num lines of a file
tail -n +num
Show all contents of the file starting from num line
tail -c num
Show last num bytes of a file
tail -f
Keep reading file until Ctrl + C
tail -F
Keep reading file until Ctrl + C; even if the file is rotated
Display the last parts of a file
Let us use tail to display the last 10 lines of the file.
tail release_names.txt
## Very Secure Dishes
## Very, Very Secure Dishes
## Supposedly Educational
## Bug in Your Hair
## Sincere Pumpkin Patch
## Another Canoe
## You Stupid Darkness
## Single Candle
## Short Summer
## Kite Eating Tree
Display the last 5 lines of a file
As we did in the previous section, use n to specify the number of lines to be displayed.
tail -n 5 release_names.txt
## Another Canoe
## You Stupid Darkness
## Single Candle
## Short Summer
## Kite Eating Tree
Display all contents from line 10
We can use tail to display all contents of a file starting from a specific line. In the below example, we display all contents of the file starting from the 10th line using the n option and + prefix while specifying the number of lines.
tail -n +10 release_names.txt
## Good Sport
## Frisbee Sailing
## Warm Puppy
## Spring Dance
## Sock it to Me
## Pumpkin Helmet
## Smooth Sidewalk
## Full of Ingredients
## World-Famous Astronaut
## Fire Safety
## Wooden Christmas Tree
## Very Secure Dishes
## Very, Very Secure Dishes
## Supposedly Educational
## Bug in Your Hair
## Sincere Pumpkin Patch
## Another Canoe
## You Stupid Darkness
## Single Candle
## Short Summer
## Kite Eating Tree
Display the last 10 bytes of a file
Use the c option to display the last 7 bytes of a file.
tail -c 7 release_names.txt
## Tree
More
The more command displays text, one screen at a time. It opens a file for
interactive reading
scrolling
and searching
Press space to scroll down the page, the forward slash (/) for searching strings, n to go to the next match and q to quit.
Command
Description
more
Open a file for interactive reading, scrolling & searching
space
Page down
/
Search for a string; press n to go the next match
q
Quit
Less
The less command is similar to more but offers more features. It allows the user to scroll up and down, go to the beggining and end of the file, forward and backward search and the ability to go the next and previous match while searching the file.
Command
Description
less
Open a file for interactive reading, scrolling & searching
space
Page down
b
Page up
G
Go to the end of file
g
Go to the start of file
/
Forward search
?
Backward search
n
Go to next match
N
Go to previous match
q
Quit
Sort
The sort command will sort the contents of text file, line by line. Using additional options, we can
sort a file in ascending/descending order
ignore case while sorting
use numeric order for sorting
preserve only unique lines while sorting
Using the sort command, the contents can be sorted numerically and alphabetically. By default, the rules for sorting are:
lines starting with a number will appear before lines starting with a letter.
lines starting with a letter that appears earlier in the alphabet will appear before lines starting with a letter that appears later in the alphabet.
lines starting with a lowercase letter will appear before lines starting with the same letter in uppercase.
Using additional options, the rules for sorting can be changed. We list the options in the below table.
Command
Description
sort
Sort lines of text files
sort -r
Sort a file in descending order
sort –ignore-case
Ignore case while sorting
sort -n
Use numeric order for sorting
sort -u
Preserve only unique lines while sorting
Sort
Let us sort the contents of the pkg_names.txt file. It contains names R packages randomly selected from CRAN.
Using the -r option which stands for –reverse the contents of the file can be sorted in descending/reverse order. Let us now sort the contents of the pkg_names.txt file in reverse order.
To sort numerically, use the -n option which stands for –numeric-sort. In this example, we will use a different file, package_names.txt where the package names are prefixed by random numbers between 1 and 100.
The -u option which stands for –unique will preserve only unique lines while sorting the contents of the file. In the below example, we remove all duplicate lines from the pkg_names.txt while sorting.
wc will print newline, word, and byte counts for file(s). If more than one file is specified, it will also print total line.
Count words, bytes and lines
wc release_names.txt
## 30 73 546 release_names.txt
Count lines in a file
wc -l release_names.txt
## 30 release_names.txt
Count words in a file
wc -w release_names.txt
## 73 release_names.txt
Count characters(bytes) in a file
wc -c release_names.txt
## 546 release_names.txt
Search & Regular Expressions
{{% youtube “8BkandsUpeI” %}}
In this section, we will explore commands that will
search for a given string in a file
find files using names
and search for binary executable files
Command
Description
grep
Search for a given string in a file
find
Find files using filenames
which
Search for binary executable files
grep
The grep command is used for pattern matching. Along with additional options, it can be used to
match pattern in input text
ignore case
search recursively for an exact string
print filename and line number for each match
invert match for excluding specific strings
grep processes text line by line, and prints any lines which match a specified pattern. grep, which stands for global regular expression print is a powerful tool for matching a regular expression against text in a file, multiple files, or a stream of input.
Command
Description
grep
Matches pattern in input text
grep -i
Ignore case
grep -RI
Search recursively for an exact string
grep -E
Use extended regular expression
grep -Hn
Print file name & corresponding line number for each match
grep -v
Invert match for excluding specific strings
Match Pattern in Input Text
Using grep let us search for packages that inlcude the letter R in their names.
In the previous case, grep returned only those packages whose name included R but not r i.e. it did not ignore the case of the letter. Using the -i option, we will now search while ignoring the case of the letter.
The find command can be used for searching files and directories. Using additional options, we can
search files by extension type
ignore case while searching files/directories
find is a powerful tool for working with the files. It can be used on its own to locate files, or in conjunction with other programs to perform operations on those files.
Command
Description
find
Find files or directories under the given directory; recursively
find -name ’*.txt’
Find files by extension
find -type d -iname
Find directories matching a given name, in case-insensitive mode
find -type d -name
Find directories matching a given name, in case-sensitive mode
Search Recursively
Let us use find to search for the file release_names.txt recursively. The -name option is used to specify the name of the file we are searching.
There are 3 files with the .txt extension in r_releases folder.
Case-insensitive Mode
Search for all folders with the name R or r. Here we use the -iname option to ignore case while searching. The -type option is used to specify whether we are searching for files or folders. Since we are searching for folder/directory, we use it along with d i.e. directory to indicate that we are searching for directories and not files.
find -type d -iname R
## ./mypackage/R
## ./r
Case-sensitive Mode
Search for all folders with the name r. It should exclude any folder with the name R.
find -type d -name r
## ./r
Data Transfer & Network
{{% youtube “06QPodqmAO0” %}}
In this section, we will explore commands that will allow us to download files from the internet.
Command
Description
wget
Download files from the web
curl
Transfer data from or to a server
hostname
Name of the current host
ping
Ping a remote host
nslookup
Name server details
We have not executed the commands in this ebook as downloading multiple files from the internet will take a lot of time or result in errors but we have checked all the commands offline to ensure that they work.
wget
The wget command will download contents of a URL and files from the internet. Using additional options, we can
download contents/files to a file
continue incomplete downloads
download multiple files
limit download speed and number of retries
Command
Description
wget url
Download contents of a url
wget -o file url
Download contents of url to a file
wget -c
Continue an incomplete download
wget -P folder_name -i urls.txt
Download all urls stored in a text file to a specific directory
wget –limit-rate
Limit download speed
wget –tries
Limit number of retries
wget –quiet
Turn off output
wget –no-verbose
Print basic information
wget –progress-dot
Change progress bar type to dot
wget –timestamping
Check if the timestamp of the file has changed before downloading
wget –wait
Wait between retrievals
Download URL
Let us first use wget to download contents of a URL. Note, we are not downloading file as such but just the content of the URL. We will use the URL of the home page of R project.
wget https://www.r-project.org/
If you look at the list of files, you can see a new file, index.html which we just downloaded using wget. Downloading contents this way will lead to confusion if we are dealing with multiple URLs. Let us learn to save the contents to a file (we can specify the name of the file which should help avoid confusion.)
Specify Filename
In this example, we download contents from the same URL and in addition specify the name of the file in which the content must be saved. Here we save it in a new file, rhomepage.html using the -o option followed by the filename.
wget -o rhomepage.html https://www.r-project.org/
Download File
How about downloading a file instead of a URL? In this example, we will download a logfile from the RStudio CRAN mirror. It contains the details of R downloads and individual package downloads. If you are a package developer and would want to know the countries in which your packages are downloaded, you will find this useful. We will download the file for 29th September and save it as sep_29.csv.gz.
How do we download multiple URLs? One way is to specify the URLs one after the other separated by a space or save all URLs in a file and read them one by one. In the below example, we have saved multiple URLs in the file urls.txt.
We will download all the above URLs and save them in a new folder downloads. The -i indicates that the URLs must be read from a file (local or external). The -P option allows us to specify the directory into which all the files will be downloaded.
wget -P downloads -i urls.txt
Quiet
The –quiet option will turn off wget output. It will not show any of the following details:
Using the -nv or –no-verbose option, we can turn off verbose without being completely quiet (as we did in the previous example). Any error messages and basic information will still be printed.
Let us say we have already downloaded a file from a URL. The file is updated from time to time and we intend to keep the local copy updated as well. Using the –timestamping option, the local file will have timestamp matching the remote file; if the remote file is not newer (not updated), no download will occur i.e. if the timestamp of the remote file has not changed it will not be downloaded. This is very useful in case of large files where you do not want to download them unless they have been updated.
sudo Super User DO is a prefix of commands that only superuser or root users are allowed to run. It is similar to run as administrator option in Windows. It is used to install, update and remove software. We will use it in the next section to install & update packages. If you are using RStudio Cloud, you will not be able to run sudo (users do not have root privileges).
Command
Description
dpkg –list
List installed packages
sudo apt-get update
Update packages
sudo apt-get install
Install packages
sudo apt-get remove
Remove packages (retain configuration, plugins and settings
sudo apt-get purge
Remove packages including personalized settings
sudo apt-get autoremove
Remove any dependencies no longer in use
File Compression
{{% youtube “ucF-wwfmAwM” %}}
tar
The tar command is used for file compression. It works with both tar and tar.gz extensions. It is used to
list files
extract files
create archives
append file to existing archives
tar creates, maintains, modifies, and extracts files that are archived in the tar format. Tar stands for tape archive and is an archiving file format.
Command
Description
tar tvf
List an archive
tar tvfz
List a gzipped archive
tar xvf
Extract an archive
tar xvfz
Extract a gzipped archive
tar cvf
Create an uncompressed tar archive
tar cvfz
Create a tar gzipped archive
tar rvf
Add a file to an existing archive
tar rvfz
Add a file to an existing gzipped archive
We will use different options along with the tar command for listing, extracting, creating and adding files. The vf (v stands for verbosely show .tar file progress and f stands for file name type of the archive file) option is common for all the above operations while the following are specific.
t for listing
x for extracting
c for creating
r for adding files
While dealing with tar.gz archives we will use z in addition to vf and the above options.
List
Let us list all the files & folders in release_names.tar. As mentioned above. to list the files in the archive, we use the t option.
To add a file to an existing archive, use the r option. Let us add release_names_18.txt and release_names_19.txt to the archive we created in the previous step.
tar -rvf release_names.tar release_names_18.txt release_names_19.txt
## release_names_18.txt
## release_names_19.txt
Create
Using the c option we can create tar archives. In the below example, we are using a single file but you can specify multiple files and folders as well.
tar -cvf pkg_names.tar pkg_names.txt
## pkg_names.txt
gzip
Command
Description
gzip
Compress a file
gzip -d
Decompress a file
gzip -c
Compress a file and specify the output file name
zip -r
Compress a directory
zip
Add files to an existing zip file
unzip
Extract files from a zip files
unzip -d
Extract files from a zip file and specify the output file name
unzip -l
List contents of a zip file
gzip, gunzip, and zcat commands are used to compress or expand files in the GNU GZIP format i.e. files with .gz extension
Compress
Let us compress release_names.txt file using gzip.
Use the -d option with gzip to decompress a file. In the below example, we decompress the sept_15.csv.gz file (downloaded using wget or curl earlier). You can also use gunzip for the same result.
Use -c and > to specify a different file name while compressing using gzip. In the below example, gzip will create releases.txt.gz instead of release_names.txt.gz.
Using the -d option, we can extract the contents of zip_example.zip to a specific folder. In the below example, we extract it to a new folder examples.
We can compress multiple directories using zip. The names of the directories must be separated by a space as shown in the below example where we compress myproject and mypackage into a single ZIP archive.
To add a new file/folder to an existing archive, specify the name of the archive followed by the name of the file or the folder. In the below example, we add the bash.sh file to the myproject.zip archive created in a previous step.
zip myproject.zip bash.sh
## adding: bash.sh (deflated 78%)
R Functions
tar & tar.gz
In R, we can use the tar() and untar() functions from the utils package to handle .tar and .tar.gz archives.
Command
R
tar tvf
utils::untar(‘archive.tar’, list = TRUE)
tar tvfz
utils::untar(‘archive.tar.gz’, list = TRUE)
tar xvf
utils::untar(‘archive.tar’)
tar xvfz
utils::untar(‘archive.tar.gz’)
tar cvf
utils::tar(‘archive.tar’)
tar cvfz
utils::tar(‘archive.tar’, compression = ‘gzip’)
zip & gzip
The zip package has the functionalities to handle ZIP archives. The tar() and untar() functions from the utils package can handle GZIP archives.
Command
R
gzip
utils::tar(compression = ‘gzip’ / R.utils::gzip()
gzip -d
utils::untar() / R.utils::gunzip()
gzip -c
utils::untar(exdir = filename)
zip -r
zip::zip()
zip
zip::zipr_append()
unzip
zip::unzip()
unzip -d
zip::unzip(exdir = dir_name)
unzip -l
zip::zip_list()
System Info
In this section, we will explore commands that will allow us to
display information about the system
display memory usage information
display file system disk space usage
exit the terminal
run commands a superuser
shutdown the system
Command
Description
uname
Display important information about the system
free
Display free, used, swap memory in the system
df
Display file system disk space usage
exit
Exit the terminal
sudo
Run command as super user
shutdown
Shutdown the system
uname
The uname command is used to view important information about the system. Using additional options, we can
print details about operating system
hardware & software related information
Command
Description
uname
Print details about the current machine and the operating system running on it
uname -mp
Hardware related information; machine & processor
uname -srv
Software related information; operating system, release number and version
uname -n
Nodename of the system
uname -a
Print all available information system
Print all available information about the system
uname -a
## Linux Aravind 4.4.0-18362-Microsoft #836-Microsoft Mon May 05 16:04:00 PST 2020 x86_64 x86_64 x86_64 GNU/Linux
Display free, used, swap memory in the system
free
##               total        used        free      shared  buff/cache   available
## Mem:        3621900     1815864     1576684       17720      229352     1672304
## Swap:      11010048      260640    10749408
In this section, let us look at a few other useful commands that will allow us to
see how long a command takes to execute
delay activity
display and clear command history list
Command
Description
time
See how long a command takes to execute
sleep
Delay activity in seconds
sleep 1m
Delay activity in minutes
sleep 1h
Delay activity in hours
history
Display command history list with line numbers
history -c
Clear the command history list
Funny Commands
Below are a few funny commands for you to try out. Use sudo apt-get install to install fortune and banner before trying them.
Command
Description
fortune
Poignant, inspirational & silly phrases
yes
Output a string repeatedly until killed
banner
ASCII banner
rev
Reverse each character
R Functions
In R, we can use Sys.sleep() to delay activity and history() to view command history.
Command
R
sleep
Sys.sleep()
history
history()
Execute Commands from R
{{% youtube “r7N5HNtmKIc” %}}
Now, let us turn our attention to executing commands from R using system2(). Here we will focus on the following
execute a command without arguments
execute commands with arguments
redirect output
Let us try to execute a command without any additional arguments. We will execute the ls command to list all files and directories. Use system2() and specify the command using the command argument. Whenever you are trying to execute a command from R, the first argument or input should be the command and it must be enclosed in quotes.
Great! Now, how do we specify the options? The additional options of a command must be stored as a character vector and specified using the args argument. In the below example, we delete the examples folder we created earlier while decompressing the zip_example.zip file.
In some cases, we might want to redirect the output. Let us say we are writing message to a file using the echo command. In this cases, we want the output to be redirected to the release.txt file. The stdout argument can be used to redirect output to a file or the R console. In the below example, we redirect the output to a file.
In the next example, we redirect the output to the R console by setting the value of the stdout argument to TRUE. If you are curious, set the value to FALSE and see what happens.
The run() command from the processx package can be used to execute shell commands as well.
Execute Shell Commands in RStudio
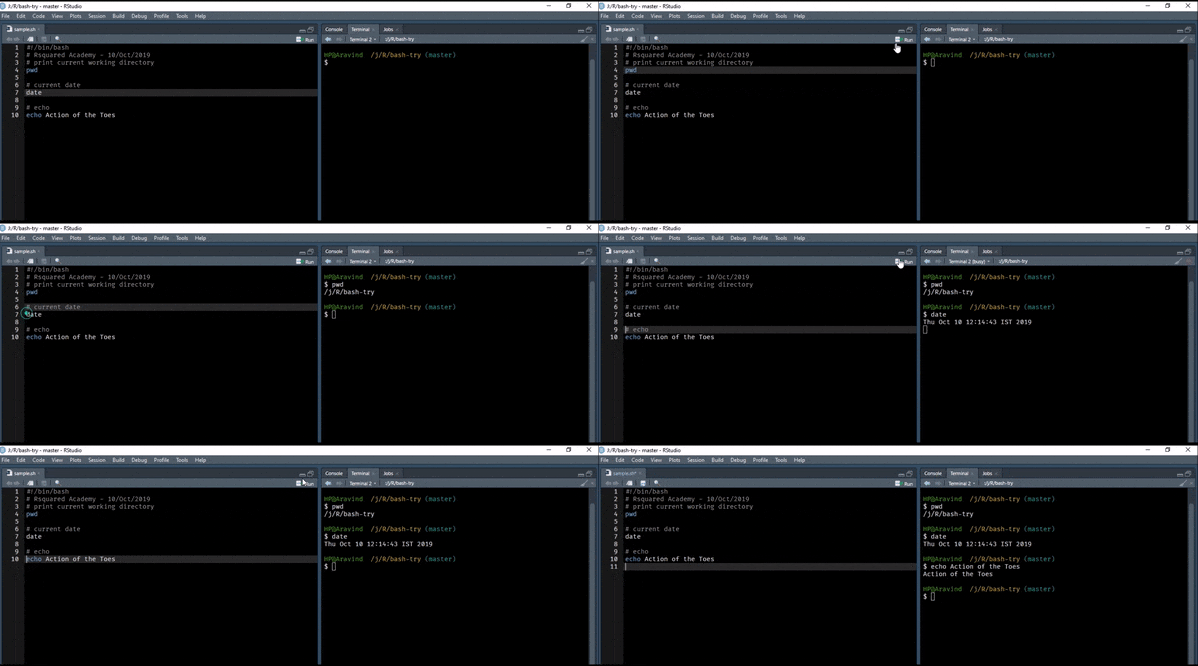
In RStudio, commands can be executed from shell scripts by pressing Ctrl + Enter. Instead of sending the command to the R console, it is redirected to the terminal where it is executed as shown below.
RMarkdown
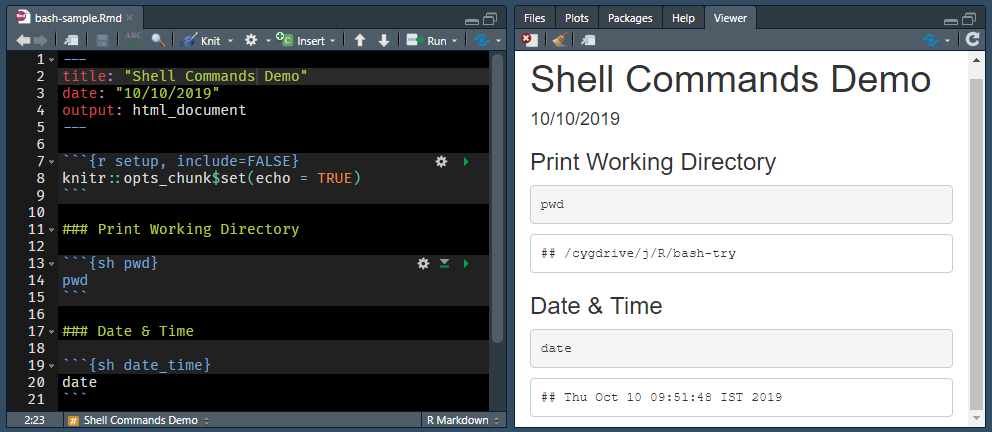
RMarkdown supports bash, sh and awk. This post was initially created using sh as the underlying operating system is Windows. Later, we used bash after installing the Windows subsystem for Linux. Click here to learn more.
R in the Shell
In this section, we will learn to execute R commands and scripts in the command line using:
R -e
Rscript -e
R CMD BATCH
The -e option allows us to specify R expression(s). R -e will launch R and then execute the code specified within quotes. Use semi-colon to execute multiple expressions as shown below. You will be able to run the below commands only if you are able to launch R from the command line. Windows users need to ensure that R is added to the path environment.
R -e "head(mtcars); tail(mtcars)"
##
## R version 4.0.0 (2020-04-24) -- "Arbor Day"
## Copyright (C) 2020 The R Foundation for Statistical Computing
## Platform: x86_64-w64-mingw32/x64 (64-bit)
##
## R is free software and comes with ABSOLUTELY NO WARRANTY.
## You are welcome to redistribute it under certain conditions.
## Type 'license()' or 'licence()' for distribution details.
##
##   Natural language support but running in an English locale
##
## R is a collaborative project with many contributors.
## Type 'contributors()' for more information and
## 'citation()' on how to cite R or R packages in publications.
##
## Type 'demo()' for some demos, 'help()' for on-line help, or
## 'help.start()' for an HTML browser interface to help.
## Type 'q()' to quit R.
##
## > head(mtcars); tail(mtcars)
##                    mpg cyl disp  hp drat    wt  qsec vs am gear carb
## Mazda RX4         21.0   6  160 110 3.90 2.620 16.46  0  1    4    4
## Mazda RX4 Wag     21.0   6  160 110 3.90 2.875 17.02  0  1    4    4
## Datsun 710        22.8   4  108  93 3.85 2.320 18.61  1  1    4    1
## Hornet 4 Drive    21.4   6  258 110 3.08 3.215 19.44  1  0    3    1
## Hornet Sportabout 18.7   8  360 175 3.15 3.440 17.02  0  0    3    2
## Valiant           18.1   6  225 105 2.76 3.460 20.22  1  0    3    1
##                 mpg cyl  disp  hp drat    wt qsec vs am gear carb
## Porsche 914-2  26.0   4 120.3  91 4.43 2.140 16.7  0  1    5    2
## Lotus Europa   30.4   4  95.1 113 3.77 1.513 16.9  1  1    5    2
## Ford Pantera L 15.8   8 351.0 264 4.22 3.170 14.5  0  1    5    4
## Ferrari Dino   19.7   6 145.0 175 3.62 2.770 15.5  0  1    5    6
## Maserati Bora  15.0   8 301.0 335 3.54 3.570 14.6  0  1    5    8
## Volvo 142E     21.4   4 121.0 109 4.11 2.780 18.6  1  1    4    2
## >
## >